
Previously on AndEngine from Scratch
Today Goals
- Finish the CatapultDetector
- Make the player react to the detector's events.
Let's go with the Detector
I have the Detector stable, here is the complete code:
package com.pruebas.andengine;
import org.anddev.andengine.input.touch.TouchEvent;
import org.anddev.andengine.input.touch.detector.BaseDetector;
import android.view.MotionEvent;
public class CatapultDetector extends BaseDetector {
// ===========================================================// Constants// ===========================================================private static final float ANGLE_CONSTANT = 90;
private static final float DEFAULT_MAX_DISTANCE = 80;
// ===========================================================// Fields// ===========================================================// Listener for the Detectorprivate final ICatapultDetectorListener mCatapultDetectorListener;
private float mMaxDistance;
// First Touchprivate float mFirstX;
private float mFirstY;
// ===========================================================// Constructors// ===========================================================public CatapultDetector(
final ICatapultDetectorListener pCatapultDetectorListener) {
this(DEFAULT_MAX_DISTANCE, pCatapultDetectorListener);
}public CatapultDetector(final float pMaxDistance,
final ICatapultDetectorListener pCatapultDetectorListener) {
this.setMaxDistance(pMaxDistance);
this.mCatapultDetectorListener = pCatapultDetectorListener;
}// ===========================================================// Methods for/from SuperClass/Interfaces// ===========================================================@Override
protected boolean onManagedTouchEvent(TouchEvent pSceneTouchEvent) {
final float touchX = this.getX(pSceneTouchEvent);
final float touchY = this.getY(pSceneTouchEvent);
final int action = pSceneTouchEvent.getAction();
switch (action) {
case MotionEvent.ACTION_DOWN:
this.mFirstX = touchX;
this.mFirstY = touchY;
return true;
case MotionEvent.ACTION_MOVE:
case MotionEvent.ACTION_UP:
// case MotionEvent.ACTION_CANCEL:final float distanceX = Math.abs(touchX - this.mFirstX);
final float distanceY = Math.abs(touchY - this.mFirstY);
final float distance = Math.min((float) Math.hypot(
(double) distanceX, (double) distanceY), mMaxDistance);
final double angleX = touchX - this.mFirstX;
final double angleY = touchY - this.mFirstY;
final float angle = (float) Math.toDegrees(Math.atan2(angleY,
angleX))
+ ANGLE_CONSTANT;
if (action == MotionEvent.ACTION_MOVE) {
this.mCatapultDetectorListener.onCharge(this, pSceneTouchEvent,
distance, angle);
} else {
this.mCatapultDetectorListener.onShoot(this, pSceneTouchEvent,
distance, angle);
}return true;
default:
return false;
}}// ===========================================================// Getter & Setter// ===========================================================public void setMaxDistance(float mMaxDistance) {
this.mMaxDistance = mMaxDistance;
}public float getMaxDistance() {
return mMaxDistance;
}// ===========================================================// Methods// ===========================================================protected float getX(final TouchEvent pTouchEvent) {
return pTouchEvent.getX();
}protected float getY(final TouchEvent pTouchEvent) {
return pTouchEvent.getY();
}// ===========================================================// Inner and Anonymous Classes// ===========================================================public static interface ICatapultDetectorListener {
// ===========================================================// Constants// ===========================================================// ===========================================================// Methods// ===========================================================public void onCharge(final CatapultDetector pCatapultDetector,
final TouchEvent pTouchEvent, final float pDistance,
final float pAngle);
public void onShoot(final CatapultDetector pCatapultDetector,
final TouchEvent pTouchEvent, final float pDistance,
final float pAngle);
}}
Let's take a look on the Listener, is the starting point of the listener.
public static interface ICatapultDetectorListener {
// ===========================================================// Constants// ===========================================================// ===========================================================// Methods// ===========================================================public void onCharge(final CatapultDetector pCatapultDetector,
final TouchEvent pTouchEvent, final float pDistance,
final float pAngle);
public void onShoot(final CatapultDetector pCatapultDetector,
final TouchEvent pTouchEvent, final float pDistance,
final float pAngle);
}
This listener has to respond two kind of events, when we are "charging" and when we shoot. The onCharge() method is for the first one and the onShoot() for the second one. The parameters to this methods are the same.
- pCatapultDetector: The detector itself.
- pTouchEvent: The current TouchScreen Event.
- pDistance: Distance from the starting point of the gesture to the current point.
- pAngle: The angle formed by the first touch point and the current.
// ===========================================================// Constants// ===========================================================private static final float ANGLE_CONSTANT = 90;
private static final float DEFAULT_MAX_DISTANCE = 80;
// ===========================================================// Fields// ===========================================================// Listener for the Detectorprivate final ICatapultDetectorListener mCatapultDetectorListener;
private float mMaxDistance;
// First Touchprivate float mFirstX;
private float mFirstY;
We have the constants
- ANGLE_CONSTANT: In the early tests, i had to sum 90 to the angle for the player to rotate the correct angle.
- DEFAULT_MAX_DISTANCE: Default max distance of charge, if not indicated in the constructor, this is the max distance of charge, if you try to charge a number larger than the max distance, the detector will trigger the listener with the max distance.
Let's view the variables.
- mCatapultDetectorListener: Is a ICatapultDetectorListener that we have seen before. Is mandatary to have one Listener.
- mMaxDistance: In this variable we hold the max distance.
- mFirstX,mFirstY: First point of touch in X,Y coordinates.
Let's go to the class constructors
// ===========================================================// Constructors// ===========================================================public CatapultDetector(
final ICatapultDetectorListener pCatapultDetectorListener) {
this(DEFAULT_MAX_DISTANCE, pCatapultDetectorListener);
}public CatapultDetector(final float pMaxDistance,
final ICatapultDetectorListener pCatapultDetectorListener) {
this.setMaxDistance(pMaxDistance);
this.mCatapultDetectorListener = pCatapultDetectorListener;
}
We have two different constructors. The first one is invoked with only one parameter, the ICatapultDetectorListener that responds to the events. In the second one we can specify the value of Max Charge distance.
The real work in the detector is in the onManagedTouchEvent() method. It has only one parameter, the TouchEvent.
final float touchX = this.getX(pSceneTouchEvent);
final float touchY = this.getY(pSceneTouchEvent);
final int action = pSceneTouchEvent.getAction();
Here we use final variables to hold data usefull later in the method. In the first line we hold the X coordinate of the event, in the second the Y coordinate and in the third we have the action performed, in our case three posible values.
- ACTION_DOWN : The user touch the screen for first time.
- ACTION_MOVE : The user has the finger on the screen and move it.
- ACTION_UP : The take the finger away from the screen.
When the event is ACTION_DOWN the only thing we need to do is keep the coordinates where the user put the finger, that we will use them to calculate angles and distance.
To the ACTION_MOVE and ACTION_UP we use the same code for both.
final float distanceX = Math.abs(touchX - this.mFirstX);
final float distanceY = Math.abs(touchY - this.mFirstY);
final float distance = Math.min((float) Math.hypot(
(double) distanceX, (double) distanceY), mMaxDistance);
final double angleX = touchX - this.mFirstX;
final double angleY = touchY - this.mFirstY;
final float angle = (float) Math.toDegrees(Math.atan2(angleY,
angleX))
+ ANGLE_CONSTANT;
if (action == MotionEvent.ACTION_MOVE) {
this.mCatapultDetectorListener.onCharge(this, pSceneTouchEvent,
distance, angle);
} else {
this.mCatapultDetectorListener.onShoot(this, pSceneTouchEvent,
distance, angle);
}return true;
First and second line, we grab the distance between the first and last touch coordinates in pixels. The third line calculates with hypot the real distance between the two points. In this third line we apply the Max distance of charge. Let's go to the angle.
The best way i found to figure th e angle between two point is the next lines method.We have in the angle variable the angle.
If the action is ACTION_MOVE we trigger an onCharge() event, if the action is ACTION_UP we trigger an onShoot() event.
With that we have finished the first version of our Detector. Sure there will be better and more efficiently ways to do this. If you have one better solution, please post it in the comments and i change the tutorial. I will send you a virtual beer ;)
Adapting the Player Class
First of all, the Player is a descendant of the AnimatedSprite class.
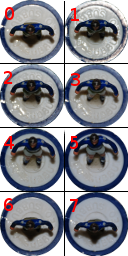
We have here the diferent frames of the animation. Let's go to work. Define a constant to hold the max frame of the charging state, if you look well, the las two frames are for the movement when the user releases the player.
private static final int PLAYER_CHARGE_ANIMATIONS = 5;
Let's add one method to the class.
public void setCharge(final float angle, final float distance)
{final int step = Math.round(distance * PLAYER_CHARGE_ANIMATIONS / Main.MAX_CHARGE_DISTANCE);
this.stopAnimation(step);
this.setRotation(angle);
}
In the first line, we use a "rule of three" (Is this correct in english?) to calculate the actual frame according to distance the detector send to us. We use the MAX_CHARGE_DISTANCE constant (we will define that later). We use the stopAnimation() method to indicate the sprite not to animate and which frame we want to see in the screen. Then we rotate the Sprite the angle.
Let's go to the Main.java and put that constant. Mine look like this:
// ===========================================================// Constants// ===========================================================private static final int CAMERA_WIDTH = 480;
private static final int CAMERA_HEIGHT = 320;
public static final float MAX_CHARGE_DISTANCE = 80;
private static final String TAG = "AndEngineTest";
In the onLoadScene() method we touch where the CatapultDetector is created and pass this constant to the constructor.
this.mScrollDetector = new SurfaceScrollDetector(this);
this.mScrollDetector.setEnabled(false);
this.mCatapultDetector = new CatapultDetector(MAX_CHARGE_DISTANCE,this);
this.mCatapultDetector.setEnabled(true);
Change the onCharge() method
@Override
public void onCharge(CatapultDetector pCatapultDetector,
TouchEvent pTouchEvent, float pDistance, float pAngle) {
this.mActivePlayer.setCharge(pAngle,pDistance);
}
Here we pass the player the level of charge. With these modifications the programs runs correctly. If you experienced any problem in this tutorial, please contact with me or post a comment and i will be pleased to solve it.
In the next chapter we will see how integrate the Box2d phisics engine and some improvements in the game.
Source Code
To get the source code: svn checkout http://ch-soccer.googlecode.com/svn/trunk/ tutorial-read-only -r 8


Felicidades! Excelentes tutoriales, no puedo esperar por la parte VI :D
ReplyDeleteOkay I got everything working except for the ball sprite is not showing? Are you just not there yet in the tutorial? I saw some code you commented out about the "new Sprite ball" but trying to use that code and cleaning it up a bit always gives me a constructor undefined error... hey at least I got further. Also I'm using a Motorola Droid 2 so my screen orientation looks a little different than yours and so does the player's position.
ReplyDeleteMy resolution is 854 x 480
Big Question:
Where did you write the code for the ball to be created and drawn and attached like the Player has been done? I was thinking this tutorial was complete and should do everything in the shown on tutorial one's page. No?
Thanks
Another great work, I need urge to buy a Android mobile :)
ReplyDeletegjoutdoors.
In this Tuto he deleted the ball, try Tutorial II and III.
Excellent so far, I've done Tutorial Part I through IV, and still need to go through Part V, but I wanted to encourage you to get Part VI online.
ReplyDeleteThanks,
Jay
It was really great stuff until version IV, then you just went off the deep end with the custom detector, difficulty jumped way too high! Its quite difficult to follow after that.
ReplyDeleteI'm writing similar game but for some reason charging and shooting my ball works kind of "not real". Can you tell something on that topic? Thanks.
ReplyDeleteSuper stuff! Ages since this post, will there still be a next one?
ReplyDeleteAndengine has suffered a lot of changes since i started the blog. Recoding all is a lot of work, and i dont want to rewrite the series and suffer the same problem again... When i have more free time i would like to do the job... But i cant promise anything.
ReplyDeleteI recently bought a book called "Learning Android Game Programming" and nearly half the stuff is deprecated! It's really annoying how there's very little documentation on AndEngine as well.
ReplyDeleteRegardless, your tutorials are very helpful! Please keep them coming when you have time.
The video shows the player is doing some action with ball. But in code no ball is getting displayed and where is the physics code to move the ball?
ReplyDelete