Previously on AndEngine from Scratch
Today's Goals
We have two objetives today:
- Splash Screen for the game
- Create the grass background
Splash Screen
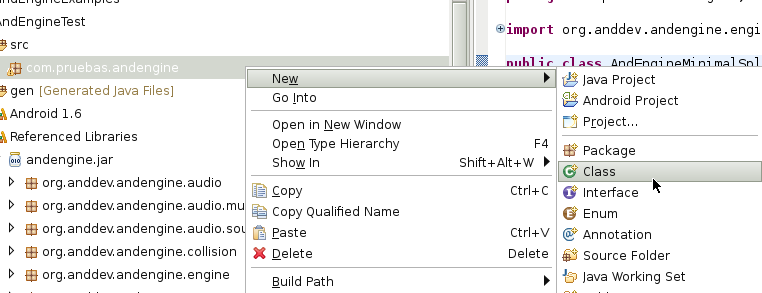
Every game deserves a decent splash screen. Let's see how can we create a nice one. AndEngine has a BaseSPlashActivity. Go to Eclipse, in the package explorer, under src/com.pruebas.andengine and create a new class.

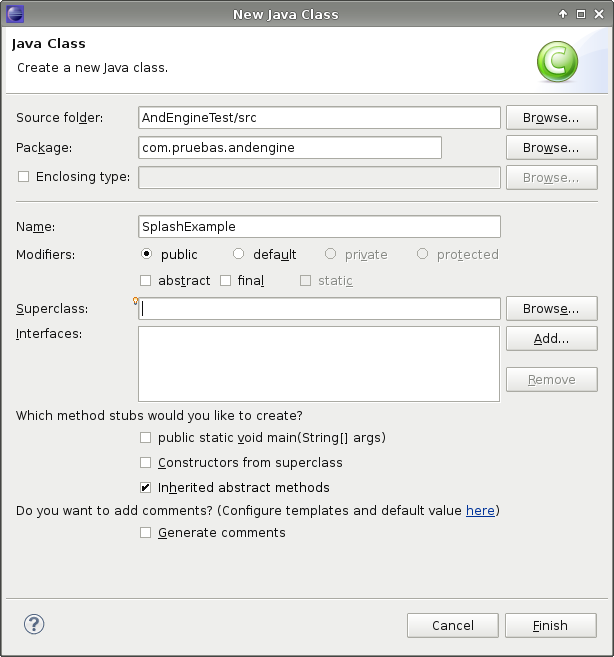
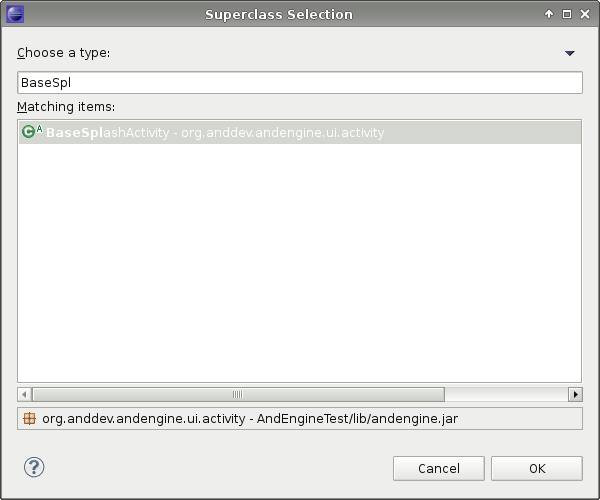
Name SplashExample and in SuperClass we must search for BaseSplashActivity.


There is the result.
package com.pruebas.andengine;
import org.anddev.andengine.engine.options.EngineOptions.ScreenOrientation;
import org.anddev.andengine.opengl.texture.source.ITextureSource;
import org.anddev.andengine.ui.activity.BaseSplashActivity;
import android.app.Activity;
public class SplashExample extends BaseSplashActivity {
@Override
//Ojo, porque esto no se ve bien aqui, dejadlo como Eclipse lo generaprotected Class<? extends Activity> getFollowUpActivity() {
// TODO Auto-generated method stubreturn null;
}@Override
protected ScreenOrientation getScreenOrientation() {
// TODO Auto-generated method stubreturn null;
}@Override
protected float getSplashDuration() {
// TODO Auto-generated method stubreturn 0;
}@Override
protected ITextureSource onGetSplashTextureSource() {
// TODO Auto-generated method stubreturn null;
}}
Now let's touch some methods of the clase to show the splash screen we want. If you dont have a decent image, you can download this one. Remember save it as assets/gfx/splash.png.

Now touch the class SplashExample.java to show the splash from that file. Let's define some constants.
// ===========================================================// Constants// ===========================================================private static final int SPLASH_DURATION = 3;
private static final float SPLASH_SCALE_FROM = 1f;
SPLASH_DURATION Defines the time in seconds for the splash, three second is fine. The second constant defines the scale that the initial bitmap, try putting 0.5f and the image will make a animation.
In the first method getFollowUpActivity() we must return the Main activity of the game.
@Override
protected Class<? extends Activity> getFollowUpActivity() {
return Main.class;
}
The second method is getScreenOrientation(), we are working in LANDSCAPE.
protected ScreenOrientation getScreenOrientation() {
return ScreenOrientation.LANDSCAPE;
}
Third mehotd getSplashDuration(), we return the constant.
@Override
protected float getSplashDuration() {
return SPLASH_DURATION;
}
And finally onGetSplashTextureSource(), we return the bitmap previously saved in assets/gfx.
protected ITextureSource onGetSplashTextureSource() {
return new AssetTextureSource(this, "gfx/splash.png");
}
Now Let's implement a new method for the zoom an play some with it.
protected float getSplashScaleFrom() {
return SPLASH_SCALE_FROM;
}
We have now the SplashExample class, now let's put it in the AndroidManifest.xml and make it the default activiy.
<activity android:name="SplashExample"android:label="@string/app_name"><intent-filter><action android:name="android.intent.action.MAIN" /><category android:name="android.intent.category.LAUNCHER" /></intent-filter></activity>
We need to remove the intent-filter for the main activity. F11 to start the game and we can see the splash screen running.
Background Grass
To create the backgound seems to be several options. First i tried with a RepeatingSpriteBackground, but it doesn't scrool with the screen. Let's try with a TMXLoader, loading the level from a xml file.
Thankfully there is a free open source level editor available for most platforms. The first is to create a sprite with the grass background. There it is. Save it to assets/gfx as ussual.

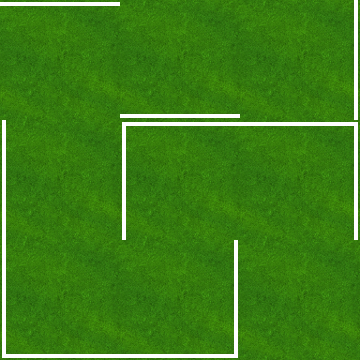
The way to create levels is based on tiled pngs. In our case we need four borders, left, right, top, bottom and a center one. Nine tiles.

There is the png with visible borders to you can make an idea of how it works. Nine tiles of 120X120. Now we mus get the level editor (tiled). In debian is as simple as "sudo apt-get install tiled". In other linux you probably have this software in the package manager of the distribution. In windows you can download the software from the web.
Caution: After install, go to Edit->Preferences and in "Store Tile layer data as" -> "Base64 gzip compressed". If you dont do that, AndEngine will crash when you try to load the tmx file.
After a funny time, i get the tmx file. Now let's add to the project. Under the assets folder we create a folder named "tmx". Here we must put our maps. Mine looks like this:
<map version="1.0" orientation="orthogonal" width="4" height="8" tilewidth="120" tileheight="120"><tileset firstgid="1" name="background" tilewidth="120" tileheight="120"><image source="gfx/background_tile.png"/></tileset><layer name="Capa de Patrones 1" width="4" height="8"><data encoding="base64" compression="gzip">H4sIAAAAAAAAA2NlYGBghGI2IGYBYk4oZqYBnx2ImaCYA4gB8HAreoAAAAA=
</data></layer></map>
Look carefully at image-source, this point to gfx/background_tile.png, if you edit the map in tiled, you must count with that.
Before we put some code, i have Main.java like this:
package com.pruebas.andengine;
import org.anddev.andengine.engine.Engine;
import org.anddev.andengine.engine.camera.ZoomCamera;
import org.anddev.andengine.engine.options.EngineOptions;
import org.anddev.andengine.engine.options.EngineOptions.ScreenOrientation;
import org.anddev.andengine.engine.options.resolutionpolicy.RatioResolutionPolicy;
import org.anddev.andengine.entity.scene.Scene;
import org.anddev.andengine.entity.scene.Scene.IOnSceneTouchListener;
import org.anddev.andengine.entity.scene.background.ColorBackground;
import org.anddev.andengine.entity.sprite.Sprite;
import org.anddev.andengine.entity.util.FPSLogger;
import org.anddev.andengine.input.touch.TouchEvent;
import org.anddev.andengine.input.touch.detector.ScrollDetector;
import org.anddev.andengine.input.touch.detector.SurfaceScrollDetector;
import org.anddev.andengine.input.touch.detector.ScrollDetector.IScrollDetectorListener;
import org.anddev.andengine.opengl.texture.Texture;
import org.anddev.andengine.opengl.texture.TextureOptions;
import org.anddev.andengine.opengl.texture.region.TextureRegion;
import org.anddev.andengine.opengl.texture.region.TextureRegionFactory;
import org.anddev.andengine.ui.activity.BaseGameActivity;
import android.util.Log;
public class Main extends BaseGameActivity implements IScrollDetectorListener,
IOnSceneTouchListener {// ===========================================================// Constants// ===========================================================static final int CAMERA_WIDTH = 480;
static final int CAMERA_HEIGHT = 320;
private static final String TAG = "AndEngineTest";
// ===========================================================// Fields// ===========================================================private ZoomCamera mCamera;
private Texture mTexture;
private TextureRegion mFaceTextureRegion;
private SurfaceScrollDetector mScrollDetector;
// ===========================================================// Constructors// ===========================================================// ===========================================================// Getter & Setter// ===========================================================// ===========================================================// Methods for/from SuperClass/Interfaces// ===========================================================@Override
public void onLoadComplete() {
// TODO Auto-generated method stub}@Override
public Engine onLoadEngine() {
this.mCamera = new ZoomCamera(0, 0, CAMERA_WIDTH, CAMERA_HEIGHT);
final int alturaTotal = CAMERA_HEIGHT * 3;
this.mCamera.setBounds(0, CAMERA_WIDTH, 0, alturaTotal);
this.mCamera.setBoundsEnabled(true);
return new Engine(new EngineOptions(true, ScreenOrientation.LANDSCAPE,
new RatioResolutionPolicy(CAMERA_WIDTH, CAMERA_HEIGHT),
this.mCamera));
}@Override
public void onLoadResources() {
this.mTexture = new Texture(64, 64,
TextureOptions.BILINEAR_PREMULTIPLYALPHA);
this.mFaceTextureRegion = TextureRegionFactory.createFromAsset(
this.mTexture, this, "gfx/ui_ball_1.png", 0, 0);
this.mEngine.getTextureManager().loadTexture(this.mTexture);
}@Override
public Scene onLoadScene() {
this.mEngine.registerUpdateHandler(new FPSLogger());
final Scene scene = new Scene(1);
scene.setBackground(new ColorBackground(0, 0, 0.8784f));
scene.setOnAreaTouchTraversalFrontToBack();
this.mScrollDetector = new SurfaceScrollDetector(this);
this.mScrollDetector.setEnabled(true);
final int centerX = (CAMERA_WIDTH - this.mFaceTextureRegion.getWidth()) / 2;
final int centerY = (CAMERA_HEIGHT - this.mFaceTextureRegion
.getHeight()) / 2;
final Sprite ball = new Sprite(centerX, centerY,
this.mFaceTextureRegion);
scene.getLastChild().attachChild(ball);
scene.setOnSceneTouchListener(this);
scene.setTouchAreaBindingEnabled(true);
return scene;
}@Override
public void onScroll(ScrollDetector pScollDetector, TouchEvent pTouchEvent,
float pDistanceX, float pDistanceY) {
this.mCamera.offsetCenter(-pDistanceX, -pDistanceY);
}@Override
public boolean onSceneTouchEvent(Scene pScene, TouchEvent pSceneTouchEvent) {
this.mScrollDetector.onTouchEvent(pSceneTouchEvent);
return true;
}// ===========================================================// Methods// ===========================================================// ===========================================================// Inner and Anonymous Classes// ===========================================================}
Vamos a crear una variable para el TMXTiledMap.
private TMXTiledMap mTMXTiledMap;
In the onLoadScene() method when we set the background color with
scene.setBackground(new ColorBackground(0, 0, 0.8784f));
Change the code with this one
final Scene scene = new Scene(1);
try {
final TMXLoader tmxLoader = new TMXLoader(this, this.mEngine
.getTextureManager(), TextureOptions.NEAREST);
this.mTMXTiledMap = tmxLoader.loadFromAsset(this, "tmx/field.tmx");
} catch (final TMXLoadException tmxle) {
Debug.e(tmxle);
}final TMXLayer tmxLayer = this.mTMXTiledMap.getTMXLayers().get(0);
scene.getFirstChild().attachChild(tmxLayer);
Now we can try the background, F11 to see how it looks... Good, isn't it? It have a little problem with the terminal i'm trying on. When i do the vertical scroll a little black lines appears in some circunstances between the tiles. A little investigation in the AndEngine forums and see the solution. Let's go to the source, when we create the background texture, and change TextureOptions.BILINEAR_PREMULTIPLYALPHA to TextureOptions.NEAREST. Then we go to the method onLoadEngine() and put some code in the camera creation to round the camera coordinates to integer.
this.mCamera = new ZoomCamera(0, 0, CAMERA_WIDTH, CAMERA_HEIGHT) {
@Override
public void onApplyMatrix(GL10 pGL) {
GLHelper.setProjectionIdentityMatrix(pGL);
GLU.gluOrtho2D(pGL, (int) this.getMinX(), (int) this.getMaxX(),
(int) this.getMaxY(), (int) this.getMinY());
}};
Perfect!! Problem solved. Now we have the code working well... there is my Main.java.
package com.pruebas.andengine;
import org.anddev.andengine.engine.Engine;
import org.anddev.andengine.engine.camera.ZoomCamera;
import org.anddev.andengine.engine.options.EngineOptions;
import org.anddev.andengine.engine.options.EngineOptions.ScreenOrientation;
import org.anddev.andengine.engine.options.resolutionpolicy.RatioResolutionPolicy;
import org.anddev.andengine.entity.layer.tiled.tmx.TMXLayer;
import org.anddev.andengine.entity.layer.tiled.tmx.TMXLoader;
import org.anddev.andengine.entity.layer.tiled.tmx.TMXTiledMap;
import org.anddev.andengine.entity.layer.tiled.tmx.util.exception.TMXLoadException;
import org.anddev.andengine.entity.scene.Scene;
import org.anddev.andengine.entity.scene.Scene.IOnSceneTouchListener;
import org.anddev.andengine.entity.sprite.Sprite;
import org.anddev.andengine.entity.util.FPSLogger;
import org.anddev.andengine.input.touch.TouchEvent;
import org.anddev.andengine.input.touch.detector.ScrollDetector;
import org.anddev.andengine.input.touch.detector.SurfaceScrollDetector;
import org.anddev.andengine.input.touch.detector.ScrollDetector.IScrollDetectorListener;
import org.anddev.andengine.opengl.texture.Texture;
import org.anddev.andengine.opengl.texture.TextureOptions;
import org.anddev.andengine.opengl.texture.region.TextureRegion;
import org.anddev.andengine.opengl.texture.region.TextureRegionFactory;
import org.anddev.andengine.ui.activity.BaseGameActivity;
import org.anddev.andengine.util.Debug;
public class Main extends BaseGameActivity implements IScrollDetectorListener,
IOnSceneTouchListener {// ===========================================================// Constants// ===========================================================static final int CAMERA_WIDTH = 480;
static final int CAMERA_HEIGHT = 320;
private static final String TAG = "AndEngineTest";
// ===========================================================// Fields// ===========================================================private ZoomCamera mCamera;
private Texture mTexture;
private TextureRegion mFaceTextureRegion;
private SurfaceScrollDetector mScrollDetector;
private TMXTiledMap mTMXTiledMap;
// ===========================================================// Constructors// ===========================================================// ===========================================================// Getter & Setter// ===========================================================// ===========================================================// Methods for/from SuperClass/Interfaces// ===========================================================@Override
public void onLoadComplete() {
// TODO Auto-generated method stub}@Override
public Engine onLoadEngine() {
this.mCamera = new ZoomCamera(0, 0, CAMERA_WIDTH, CAMERA_HEIGHT);
final int alturaTotal = CAMERA_HEIGHT * 3;
this.mCamera.setBounds(0, CAMERA_WIDTH, 0, alturaTotal);
this.mCamera.setBoundsEnabled(true);
return new Engine(new EngineOptions(true, ScreenOrientation.LANDSCAPE,
new RatioResolutionPolicy(CAMERA_WIDTH, CAMERA_HEIGHT),
this.mCamera));
}@Override
public void onLoadResources() {
this.mTexture = new Texture(64, 64,
TextureOptions.BILINEAR_PREMULTIPLYALPHA);
this.mFaceTextureRegion = TextureRegionFactory.createFromAsset(
this.mTexture, this, "gfx/ui_ball_1.png", 0, 0);
this.mEngine.getTextureManager().loadTexture(this.mTexture);
}@Override
public Scene onLoadScene() {
this.mEngine.registerUpdateHandler(new FPSLogger());
final Scene scene = new Scene(1);
try {
final TMXLoader tmxLoader = new TMXLoader(this, this.mEngine
.getTextureManager(), // TextureOptions.BILINEAR_PREMULTIPLYALPHA,
TextureOptions.NEAREST);
this.mTMXTiledMap = tmxLoader.loadFromAsset(this, "tmx/field.tmx");
} catch (final TMXLoadException tmxle) {
Debug.e(tmxle);
}final TMXLayer tmxLayer = this.mTMXTiledMap.getTMXLayers().get(0);
scene.getFirstChild().attachChild(tmxLayer);
scene.setOnAreaTouchTraversalFrontToBack();
this.mScrollDetector = new SurfaceScrollDetector(this);
this.mScrollDetector.setEnabled(true);
final int centerX = (CAMERA_WIDTH - this.mFaceTextureRegion.getWidth()) / 2;
final int centerY = (CAMERA_HEIGHT - this.mFaceTextureRegion
.getHeight()) / 2;
final Sprite ball = new Sprite(centerX, centerY,
this.mFaceTextureRegion);
scene.getLastChild().attachChild(ball);
scene.setOnSceneTouchListener(this);
scene.setTouchAreaBindingEnabled(true);
return scene;
}@Override
public void onScroll(ScrollDetector pScollDetector, TouchEvent pTouchEvent,
float pDistanceX, float pDistanceY) {
this.mCamera.offsetCenter(-pDistanceX, -pDistanceY);
}@Override
public boolean onSceneTouchEvent(Scene pScene, TouchEvent pSceneTouchEvent) {
this.mScrollDetector.onTouchEvent(pSceneTouchEvent);
return true;
}// ===========================================================// Methods// ===========================================================// ===========================================================// Inner and Anonymous Classes// ===========================================================}
Well, enough for today. In the next chapter we are gonna implement our own Detector, like the IScrollDetector we see in the previous chapter, but to archery games.
Source Code
To get the source code: svn checkout http://ch-soccer.googlecode.com/svn/trunk/ tutorial-read-only -r 6


I get the splash screen perfectly but I'm losing you, it seems, the further along we get. I finished this tutorial and have my code just like yours I think and keep getting a force close from the emulator. I haven't messed with the emu too much so not sure what I could have done to it or not done to it so this will work...
ReplyDeleteI get as far as the splash screen animating and scaling largerand then after about 5 seconds and thenn boom! ..."force close".
sad face
Any ides??
Thanks!
Thanks for the comment.
ReplyDeleteI'm trying to start the project from cero, upload the sources to google code and make instructions at the end of every chapter to download tested sources.
I'm new with subversion and need a little researching... look in the next week.
In the debug perspective in the debug window you must see some information about the error, if you email me the error i will try to solve it.
Same thing here, force close after splash screen. After stepping trough with debuger I noticed that android is trying to find a MainGame class but without success.
ReplyDeleteTry downloading the sources from the subversion repository:
ReplyDeletesvn checkout http://ch-soccer.googlecode.com/svn/trunk/ tutorial-read-only -r 6
Is tested working on the emulator.
Thank you for the feedback.
For the force close problem, ensure you have BOTH activities in your AndroidManifest.xml file. The SplashExample does not replace the Main activity. For example:
ReplyDelete<activity android:name="SplashExample" android:label="@string/app_name">
<intent-filter>
<action android:name="android.intent.action.MAIN" />
<category android:name="android.intent.category.LAUNCHER" />
</intent-filter>
</activity>
<activity android:name="Main" android:label="@string/app_name"></activity>
Okay I was able to get the Tile program to work and produce a .tmx file but what did you call it. This is what is causing the force close I'm pretty sure because it is crashing on the tmx file because I couldn't really follow you on those steps. What should be the contents of the 'tmx' folder?
ReplyDeleteI did make the changes to my code to be exactly like that in the link posted above. I did have the manifest file wrong but it still force closes because of a general unknown andengine package error.
Thanks again!
Had a force close too. I had to change my tmx file. Try my suggestion maybe it will help you too.
ReplyDelete- Open tmx file with notepad
- Change the path of background_tile.png file from "../gfx/" to "gfx/".
@TommyAngelo
ReplyDeleteThank you; that solved it for me.
Unfortunately, I have to add the ../ to the path again in order to edit the .tmx file with Tiled, then take it out to compile in Eclipse... but now we can move forward! Thanks!
Nice Tutorial!
ReplyDeleteThings that I did to work.
1. Copy & paste your field.tmx code into mine, maybe I mess with something in Tiled.
2. About "onApplyMatrix()", work only without that step, if I override it, I got a black screen.
Ok, now I know how to play with Tiled :P
ReplyDeleteEverything Ok.
About onApplyMatrix(), I'm using the linux AVD emulator with a 1.6 api.
could only see the grass using your tmx file. My tmx file generated on OSX gave a slightly different data string. It was base64 gzip, but did background ended up completely black. Only difference in the tmx file was the data which was this:
ReplyDeleteH4sIAAAAAAAAA2NgGFgAAJ36qMKAAAAA
Maybe I missed some option in tiled on OSX ...
ah, worked it out. I actually have to draw the pitch myself in tiled ...
ReplyDeleteNote, in the current AndEngine I found this code causes a NPE:
ReplyDeletefinal TMXLayer tmxLayer = this.mTMXTiledMap.getTMXLayers().get(0);
scene.getLastChild().attachChild(tmxLayer); // NPE Here
It seems, that until you add at least one child, getLastChild now returns null. Replace it with the following:
scene.attachChild(tmxLayer);
The subsequent call to getLastChild().attachChild(ball) will work because you have added the tmx layer as the first child...
I'm stuck at how to use tiled to make a tmx file.
ReplyDeleteCan you post details on how to do that step?
hello
ReplyDeleteplz tell me how to create tmx file and how to make maps which we used in tmx folder...I am completely lost after making splash...plz help soon
thanks in advance
Open Tiled, click File -> New Map, I used 'orthogonal', width-4, height-8, click OK.
ReplyDeleteClick Edit -> Preferences. Change first box to Base64 (gzip compressed), click OK.
Click Map -> New tileset, find the background_tile.png, set tile width and height, click OK. Tiled will slice up the image into 120 by 120 tiles. You can now click a tile and click on the main window to draw the map.
Save the file, put into your tmx folder inside assets. Open tmx file in notepad, check the link to background_tile.png to make sure 'gfx' is referenced. Run the tutorial and you're good to go.
@murphy - thanks for clearing that up!
ReplyDeleteIf you compile the new andengine.jar from https://andengine.googlecode.com/hg/ andengine ?
ReplyDeleteReplace existing code with this code in the SplashExample.class
@Override
protected IBitmapTextureAtlasSource onGetSplashTextureAtlasSource() {
// OLD: return new AssetTextureSource(this, "gfx/splash.png");
return new AssetBitmapTextureAtlasSource(this, "gfx/splash.png");
}
This comment has been removed by the author.
ReplyDelete