Previously on AndEngine from Scratch
Creating our first object
Before we create our first object, we are gonna touch the AndroidManifest.xml to add the permission to lock the phone from suspension. We go to the AndroidManifest.xml file in the root of our project and edit the file as xml. After the line
<uses-sdk android:minSdkVersion="4" />
We must put
<uses-permission android:name="android.permission.WAKE_LOCK"/>
Let's create our first object in screen. To use images and other resources, Andengine doesn't use the typcal R from Android development. We must create a folder in assets called gfx.
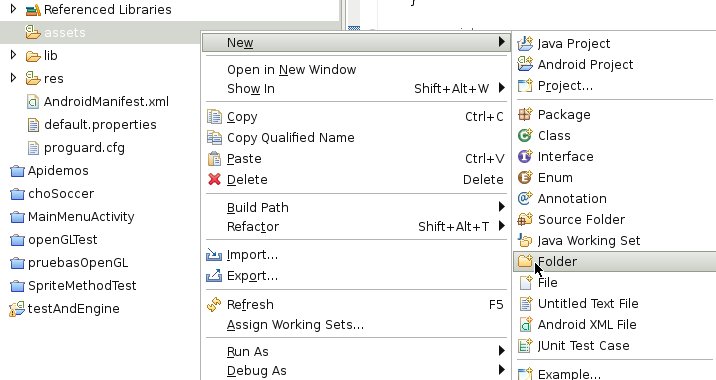
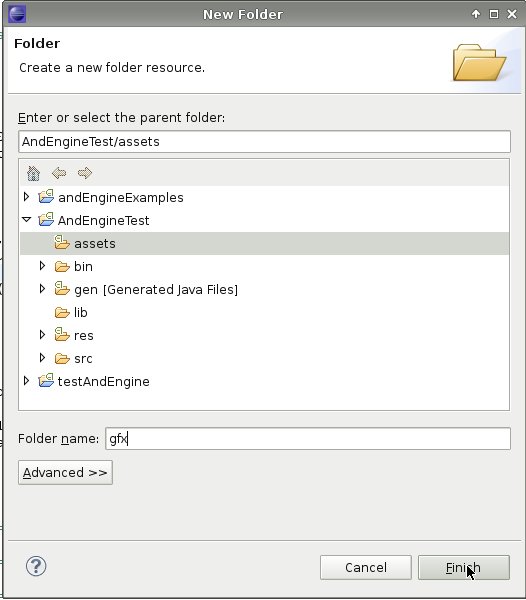
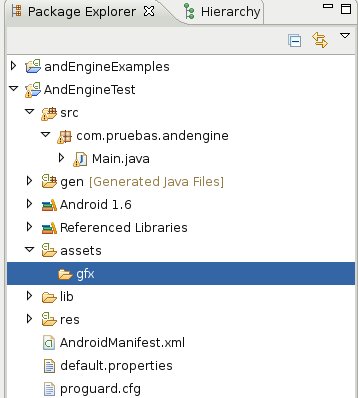
Now download this image to your hard drive and put it in the assets/gfx recently created folder, you can directly save to the desired location or drag from your folder to the eclipse gfx folder.

The next step is modify our source in Eclipse to show the image. In the part when we defined the camera, we must add two new variables.
// ===========================================================
// Fields
// ===========================================================
private ZoomCamera mCamera;
private Texture mTexture;
private TextureRegion mFaceTextureRegion;
In the onLoadResources() method need to load the image to memory.
@Override
public void onLoadResources() {
this.mTexture = new Texture(64, 64, TextureOptions.BILINEAR_PREMULTIPLYALPHA);
this.mFaceTextureRegion = TextureRegionFactory.createFromAsset(this.mTexture, this, "gfx/ui_ball_1.png", 0, 0);
this.mEngine.getTextureManager().loadTexture(this.mTexture);
}
And finally, in the onLoadScene() method put some code to show the image centered in the screen
@Override
public Scene onLoadScene() {
this.mEngine.registerUpdateHandler(new FPSLogger());
final Scene scene = new Scene(1);
scene.setBackground(new ColorBackground(0, 0, 0.8784f));
final int centerX = (CAMERA_WIDTH - this.mFaceTextureRegion.getWidth()) / 2;
final int centerY = (CAMERA_HEIGHT - this.mFaceTextureRegion.getHeight()) / 2;
/* Dibujamos la bola en el centro de la pantalla. */final Sprite ball = new Sprite(centerX, centerY, this.mFaceTextureRegion);
scene.getLastChild().attachChild(ball);
return scene;
}
Now run our project and we can see what we expected on the screen.
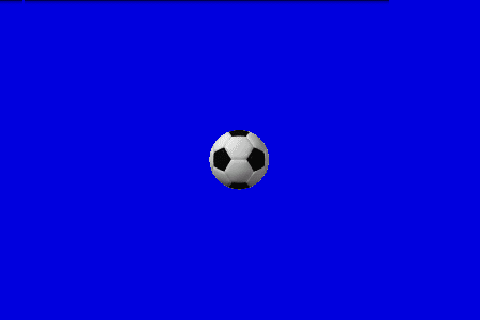
Until now everything runs correctly. Now let's control the camera movement touching the screen.
Constrolling Scroll
In order to the scroll to work, we need our Main class to implement two interfaces.
- IScrollDetectorListener: This class that AndEngine bring to us is to control the scroll movement. We must add the interface and implement the necessary methods.
- IOnSceneTouchListener: This class give us the posibility to control the touchScreen.
The class looks like this:
public class Main extends BaseGameActivity implements IScrollDetectorListener, IOnSceneTouchListener
Let's implement the two necessary methods-
public void onScroll(ScrollDetector pScollDetector, TouchEvent pTouchEvent,
float pDistanceX, float pDistanceY) {
}@Override
public boolean onSceneTouchEvent(Scene pScene, TouchEvent pSceneTouchEvent) {
return true;
}
Now let's put some code into the methods. In the onScroll we put only a Debug Message.
public void onScroll(ScrollDetector pScollDetector, TouchEvent pTouchEvent,
float pDistanceX, float pDistanceY) {
Log.d(TAG, "Scroll {x:"+pDistanceX+", y: "+pDistanceY+"}");
}
In the TouchEvent, we pass directly the params to the ScrollDetector.
public boolean onSceneTouchEvent(Scene pScene, TouchEvent pSceneTouchEvent) {
this.mScrollDetector.onTouchEvent(pSceneTouchEvent);
return true;
}
We must touch a little the LoadScene() method in order to the Engine Listen the TouchScreen events.
public Scene onLoadScene() {
this.mEngine.registerUpdateHandler(new FPSLogger());
final Scene scene = new Scene(1);
scene.setBackground(new ColorBackground(0, 0, 0.8784f));
scene.setOnAreaTouchTraversalFrontToBack();
this.mScrollDetector = new SurfaceScrollDetector(this);
this.mScrollDetector.setEnabled(true);
final int centerX = (CAMERA_WIDTH - this.mFaceTextureRegion.getWidth()) / 2;
final int centerY = (CAMERA_HEIGHT - this.mFaceTextureRegion.getHeight()) / 2;
/* Dibujamos la bola en el centro de la pantalla. */final Sprite ball = new Sprite(centerX, centerY, this.mFaceTextureRegion);
scene.getLastChild().attachChild(ball);
scene.setOnSceneTouchListener(this);
scene.setTouchAreaBindingEnabled(true);
return scene;
}
Add the ScrollDetector to Fields.
// ===========================================================// Fields// ===========================================================private ZoomCamera mCamera;
private Texture mTexture;
private TextureRegion mFaceTextureRegion;
private SurfaceScrollDetector mScrollDetector;
Let's go to the Debug Perspective and let's define to filters to see the information in a confortable way. We must create "AndEngineTest" and "AndEngine" filters.
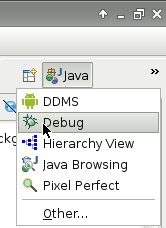

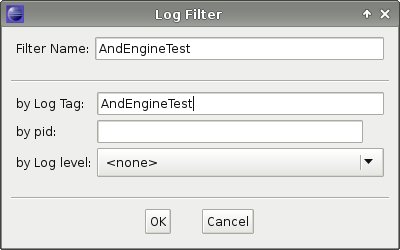
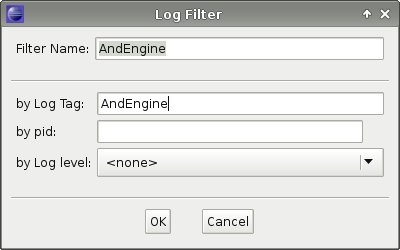
Now we have the Eclipse ready to see some information about what's going on. Debug the project (F11), switch to Debug Perspective and tap with the finger in the screen (or the mouse in the emulator) and move around. This is what we must see in the debug window.
Now, the Main.java file looks like this:
package com.pruebas.andengine;
import org.anddev.andengine.engine.Engine;
import org.anddev.andengine.engine.camera.ZoomCamera;
import org.anddev.andengine.engine.options.EngineOptions;
import org.anddev.andengine.engine.options.EngineOptions.ScreenOrientation;
import org.anddev.andengine.engine.options.resolutionpolicy.RatioResolutionPolicy;
import org.anddev.andengine.entity.scene.Scene;
import org.anddev.andengine.entity.scene.Scene.IOnSceneTouchListener;
import org.anddev.andengine.entity.scene.background.ColorBackground;
import org.anddev.andengine.entity.sprite.Sprite;
import org.anddev.andengine.entity.util.FPSLogger;
import org.anddev.andengine.input.touch.TouchEvent;
import org.anddev.andengine.input.touch.detector.ScrollDetector;
import org.anddev.andengine.input.touch.detector.SurfaceScrollDetector;
import org.anddev.andengine.input.touch.detector.ScrollDetector.IScrollDetectorListener;
import org.anddev.andengine.opengl.texture.Texture;
import org.anddev.andengine.opengl.texture.TextureOptions;
import org.anddev.andengine.opengl.texture.region.TextureRegion;
import org.anddev.andengine.opengl.texture.region.TextureRegionFactory;
import org.anddev.andengine.ui.activity.BaseGameActivity;
import android.util.Log;
public class Main extends BaseGameActivity implements IScrollDetectorListener,
IOnSceneTouchListener {// ===========================================================// Constants// ===========================================================static final int CAMERA_WIDTH = 480;
static final int CAMERA_HEIGHT = 320;
private static final String TAG = "AndEngineTest";
// ===========================================================// Fields// ===========================================================private ZoomCamera mCamera;
private Texture mTexture;
private TextureRegion mFaceTextureRegion;
private SurfaceScrollDetector mScrollDetector;
// ===========================================================// Constructors// ===========================================================// ===========================================================// Getter & Setter// ===========================================================// ===========================================================// Methods for/from SuperClass/Interfaces// ===========================================================@Override
public void onLoadComplete() {
// TODO Auto-generated method stub}@Override
public Engine onLoadEngine() {
this.mCamera = new ZoomCamera(0, 0, CAMERA_WIDTH, CAMERA_HEIGHT);
return new Engine(new EngineOptions(true, ScreenOrientation.LANDSCAPE,
new RatioResolutionPolicy(CAMERA_WIDTH, CAMERA_HEIGHT),
this.mCamera));
}@Override
public void onLoadResources() {
this.mTexture = new Texture(64, 64,
TextureOptions.BILINEAR_PREMULTIPLYALPHA);
this.mFaceTextureRegion = TextureRegionFactory.createFromAsset(
this.mTexture, this, "gfx/ui_ball_1.png", 0, 0);
this.mEngine.getTextureManager().loadTexture(this.mTexture);
}@Override
public Scene onLoadScene() {
this.mEngine.registerUpdateHandler(new FPSLogger());
final Scene scene = new Scene(1);
scene.setBackground(new ColorBackground(0, 0, 0.8784f));
scene.setOnAreaTouchTraversalFrontToBack();
this.mScrollDetector = new SurfaceScrollDetector(this);
this.mScrollDetector.setEnabled(true);
final int centerX = (CAMERA_WIDTH - this.mFaceTextureRegion.getWidth()) / 2;
final int centerY = (CAMERA_HEIGHT - this.mFaceTextureRegion
.getHeight()) / 2;
/* Dibujamos la bola en el centro de la pantalla. */final Sprite ball = new Sprite(centerX, centerY,
this.mFaceTextureRegion);
scene.getLastChild().attachChild(ball);
scene.setOnSceneTouchListener(this);
scene.setTouchAreaBindingEnabled(true);
return scene;
}@Override
public void onScroll(ScrollDetector pScollDetector, TouchEvent pTouchEvent,
float pDistanceX, float pDistanceY) {
Log.d(TAG, "Scroll {x:" + pDistanceX + ", y: " + pDistanceY + "}");
}@Override
public boolean onSceneTouchEvent(Scene pScene, TouchEvent pSceneTouchEvent) {
this.mScrollDetector.onTouchEvent(pSceneTouchEvent);
return true;
}// ===========================================================// Methods// ===========================================================// ===========================================================// Inner and Anonymous Classes// ===========================================================}

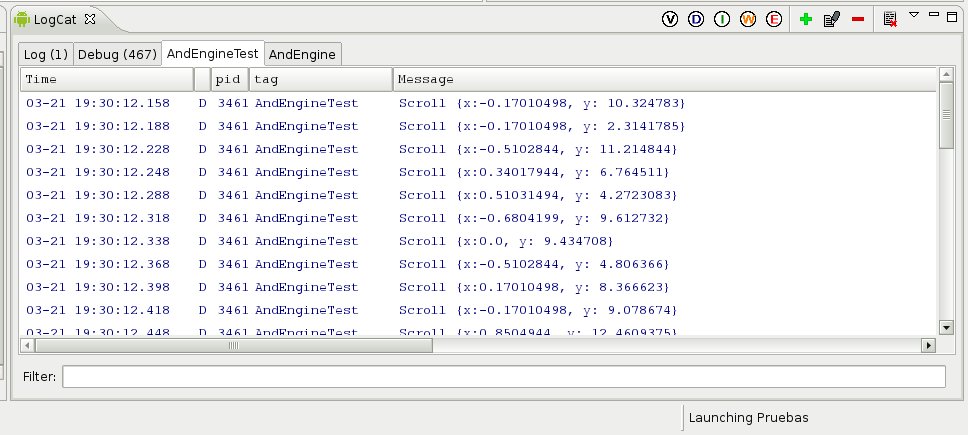
In the AndEngine filter, we can see some AndEngine messages, inicialization, and the FPS of the game. In the AndEngineTest fiter, we can see the debug messages we put in the sources.
In my case, i have moved the finger first up and then down verticaly, and in the debug i can see correct messages. Changing values in the Y axis.
We have suscefully detected the movement of the finger on the screen, and AndEngine bring to us some classes to make the process easier.Let's define some boundaries.
Controling the camera
Some code to put on the onScroll() method
@Override
public void onScroll(ScrollDetector pScollDetector, TouchEvent pTouchEvent,
float pDistanceX, float pDistanceY) {
this.mCamera.offsetCenter(-pDistanceX, -pDistanceY);
}
We debug and we now can move the camera with scroll movements of the finger. But it has no limits, we need to define them.
@Override
public Engine onLoadEngine() {
this.mCamera = new ZoomCamera(0, 0, CAMERA_WIDTH, CAMERA_HEIGHT);
final int alturaTotal = CAMERA_HEIGHT*3;
this.mCamera.setBounds(0, CAMERA_WIDTH, 0, alturaTotal);
this.mCamera.setBoundsEnabled(true);
return new Engine(new EngineOptions(true, ScreenOrientation.LANDSCAPE,
new RatioResolutionPolicy(CAMERA_WIDTH, CAMERA_HEIGHT),
this.mCamera));
}
Well... that ends the phase two. The next lesson we are going to put some background, and play with sprites.
Source Code
To get the source code: svn checkout http://ch-soccer.googlecode.com/svn/trunk/ tutorial-read-only -r 4


I followed this example and it almost works. I can drag the ball right (from the middle.) But, it never goes up or down or left from the middle...How come is that?
ReplyDeleteThis comment has been removed by the author.
ReplyDeleteActually you can adjust the parameters of mCamera.setBounds().
ReplyDeleteWorks perfectly
ReplyDeletepitosalas:
ReplyDeleteIf you want to move the ball instead of the camera, make the ball sprite public by moving the definition from onLoadScene to the top, and change this line:
this.mCamera.offsetCenter(-pDistanceX, -pDistanceY);
to this:
ball.setPosition( ball.getX() + pDistanceX, ball.getY() + pDistanceY);
Thanks for your tutorial! There is not much documentation on AndEngine, so every bit is highly welcomed... :)
ReplyDeleteJust a note: In the latest version of AndEngine, the texture loading does not work anymore as described here (only if the jar is built from scratch). Took me a bit of surfing through the code. Help can be found here: http://code.google.com/p/andengineexamples/source/browse/src/org/anddev/andengine/examples/LoadTextureExample.java
Thank you for the comment. I have to change some code to reflect the changes in andengine and upload the updated source code of the project, and some other tutorials. I 've a game upcoming in the market in the next weeks and i will continue with this job.
ReplyDeleteThank all for the comments... you encourage me to continue with the work. Any help would be appreciated.
I had to change it to:
ReplyDelete[code]
@Override
public void onLoadResources() {
this.mTexture = new BitmapTextureAtlas(64, 64, TextureOptions.BILINEAR_PREMULTIPLYALPHA);
this.mFaceTextureRegion = BitmapTextureAtlasTextureRegionFactory.createFromAsset
(this.mTexture, this, "gfx/ui_ball_1.png", 0, 0);
this.mEngine.getTextureManager().loadTexture(this.mTexture);
}
@Override
public Scene onLoadScene() {
this.mEngine.registerUpdateHandler(new FPSLogger());
final Scene scene = new Scene();//(1);
scene.setBackground(new ColorBackground(0, 0, 0.8784f));
final int centerX = (CAMERA_WIDTH - this.mFaceTextureRegion.getWidth()) / 2;
final int centerY = (CAMERA_HEIGHT - this.mFaceTextureRegion.getHeight()) / 2;
/* Dibujamos la bola en el centro de la pantalla. */
final Sprite ball = new Sprite(centerX, centerY, this.mFaceTextureRegion);
scene.attachChild(ball);
//scene.getLastChild().attachChild(ball);
return scene;
}
[/code]
Hi,
ReplyDeleteI have write your as it given above but when I touch on Screen the error is occurred.
"The Application stopped Unexpectedly. Please Try again." Button is appeared Force Close.
Why its happened?????
@Adnan, I think you may have forgotten to load the ball picture into the Texture object. I was following the tutorial line by line and can't figure out how I missed it. If your onLoadResources method is empty, then that's where the problem is.
ReplyDelete@Adnan, You'll also get the same error if you don't change the last line in onLoadScene().
ReplyDeleteFrom Lucretia9's edit:
scene.attachChild(ball);
//scene.getLastChild().attachChild(ball);
greatest tutorial I've ever seen. thanks a lot for this very very helpful tutorial
ReplyDeleteThanks for this post!
ReplyDeleteBut do we have a way to perform as a scrollview. I means
the motion after we stop scrolling, the screen would scroll a bit more after we leave touching?
Of course, don't forget to change your declaration of mTexture:
ReplyDeleteprivate BitmapTextureAtlas mTexture;
Thanks for the tutorial ! Very useful !
ReplyDeleteI have problem in method onLoadResources, this my source:
ReplyDelete1. this.mTexture = new Texture(66, 64, TextureOptions.BILINEAR_PREMULTIPLYALPHA);
there is an error message, that is : cannot instantiae the type texture.
2. this.mFaceTextureRegion = TextureRegionFactory.createFromAsset(this.mTexture, this, "gfx/ui_ball_1.png", 0, 0);
there is an error message, that is : The method createFromAsset(Texture, SpriteExampleActivity, String, int, int) is undefined for the type
TextureRegionFactory
whats the problem?.. help me please.. thanks..
I have the same problem as erctz. Eclips expects BuildableTexture instead of Texture. Help us please!
ReplyDeleteI've changed type of mTexture on BuildableTexture everywhere. Now there is no error but no ball too...only empty scene
ReplyDeleteWhen I Run the application,am getting this error
ReplyDelete04-18 20:54:45.259: WARN/dalvikvm(491): threadid=1: thread exiting with uncaught exception (group=0x4001d800)
04-18 20:54:45.319: ERROR/AndroidRuntime(491): FATAL EXCEPTION: main
04-18 20:54:45.319: ERROR/AndroidRuntime(491): java.lang.IllegalArgumentException: Supplied pTextureSource must not exceed bounds of Texture.
04-18 20:54:45.319: ERROR/AndroidRuntime(491): at org.anddev.andengine.opengl.texture.Texture.checkTextureSourcePosition(Texture.java:145)
04-18 20:54:45.319: ERROR/AndroidRuntime(491): at org.anddev.andengine.opengl.texture.Texture.addTextureSource(Texture.java:131)
04-18 20:54:45.319: ERROR/AndroidRuntime(491): at org.anddev.andengine.opengl.texture.region.TextureRegionFactory.createFromSource(TextureRegionFactory.java:89)
04-18 20:54:45.319: ERROR/AndroidRuntime(491): at org.anddev.andengine.opengl.texture.region.TextureRegionFactory.createFromAsset(TextureRegionFactory.java:67)
04-18 20:54:45.319: ERROR/AndroidRuntime(491): at andengine.test.AndEngineTestActivity.onLoadResources(AndEngineTestActivity.java:74)
04-18 20:54:45.319: ERROR/AndroidRuntime(491): at org.anddev.andengine.ui.activity.BaseGameActivity.doResume(BaseGameActivity.java:158)
04-18 20:54:45.319: ERROR/AndroidRuntime(491): at org.anddev.andengine.ui.activity.BaseGameActivity.onWindowFocusChanged(BaseGameActivity.java:83)
04-18 20:54:45.319: ERROR/AndroidRuntime(491): at com.android.internal.policy.impl.PhoneWindow$DecorView.onWindowFocusChanged(PhoneWindow.java:1981)
04-18 20:54:45.319: ERROR/AndroidRuntime(491): at android.view.View.dispatchWindowFocusChanged(View.java:3788)
04-18 20:54:45.319: ERROR/AndroidRuntime(491): at android.view.ViewGroup.dispatchWindowFocusChanged(ViewGroup.java:658)
04-18 20:54:45.319: ERROR/AndroidRuntime(491): at android.view.ViewRoot.handleMessage(ViewRoot.java:1921)
04-18 20:54:45.319: ERROR/AndroidRuntime(491): at android.os.Handler.dispatchMessage(Handler.java:99)
04-18 20:54:45.319: ERROR/AndroidRuntime(491): at android.os.Looper.loop(Looper.java:123)
04-18 20:54:45.319: ERROR/AndroidRuntime(491): at android.app.ActivityThread.main(ActivityThread.java:4627)
04-18 20:54:45.319: ERROR/AndroidRuntime(491): at java.lang.reflect.Method.invokeNative(Native Method)
04-18 20:54:45.319: ERROR/AndroidRuntime(491): at java.lang.reflect.Method.invoke(Method.java:521)
04-18 20:54:45.319: ERROR/AndroidRuntime(491): at com.android.internal.os.ZygoteInit$MethodAndArgsCaller.run(ZygoteInit.java:868)
04-18 20:54:45.319: ERROR/AndroidRuntime(491): at com.android.internal.os.ZygoteInit.main(ZygoteInit.java:626)
04-18 20:54:45.319: ERROR/AndroidRuntime(491): at dalvik.system.NativeStart.main(Native Method)
04-18 20:54:45.379: WARN/ActivityManager(58): Force finishing activity andengine.test/.AndEngineTestActivity
This is really useful.
ReplyDelete